Using an Ergolutions / Tuya Desk controller with Home Assistant
by Benjamin Schieder
A year or so ago I got one of my best additions to my Home Office: a convertible standing desk. I can raise it up to stand at it, or lower it down to sit, or have it somewhere in between so I can store my chair underneath the desk so it takes up less space. The UX of this desk’s controller unit left a lot to be desired, though.
First off, it’s a Tuya device. BOO! Second, even it’s touch interface is horrible for me. You need to press and hold a touch sensitive button for a few seconds to unlock the other controls for about 20 seconds. If you accidentally also touch the neighbouring controls, it won’t unlock, but there’s also no feedback for the double touch. So I sit there waiting for something to happen that’ll never happen unless I stop and try again.
I started a few attempts to nicely integrate this controller into my Home Assistant setup, but never got where I wanted to be. Until today!
Local Tuya
First, get Local Tuya up and running in your Home Assistant. Setting that up is out of scope of this document. Please refer to Local Tuya’s documentation.
Once you have your desk registered with Tuya, you can grab the device ID
using Tuya’s IOT website. For this document, mine
is bf3aabcdef1234567890ab.
Before integrating the device into Home Assistant, you need to check Tuya’s
API Explorer. On the left
bar, click on Device Control -> Query Properties and enter your device ID
into the respective input field. Leave the codes field blank. You’ll get
a response like the one below. I’ve omitted the fields I don’t care about.
{
  "result": {
    "properties": [
      {
        "code": "child_lock",
        "custom_name": "",
        "dp_id": 6,
        "time": 1726413955162,
        "type": "bool",
        "value": true
      },
...
      {
        "code": "height_display",
        "custom_name": "",
        "dp_id": 152,
        "time": 1726420358337,
        "type": "value",
        "value": 710
      },
...
      {
        "code": "memory_location",
        "custom_name": "",
        "dp_id": 155,
        "time": 1726384617677,
        "type": "enum",
        "value": "mem1"
      },
...
  },
}
These are the three entities I have integrated into Home Assistant.
child_lock is the touch interface lock, and can be disabled temporarily
through this property. height_display is the height displayed on the
controller, and is what the controller thinks the current desk height is.
memory_location is a write-only enum supporting the values mem1 through
mem4 and references the three shortcut buttons (1, 2 and 3). I have no
idea what mem4 references. If you know, let me know!
Now it’s time to integrate the desk into Home Assistant.
Home Assistant
After enabling the Local Tuya integration into Home Assistant, you’ll need to configure it. You’ll need the Client ID, Secret and User ID to get started. Refer to Local Tuya’s Documentation on how to get those and start the integration.
Then start device discovery and select your Standing Desk. Make sure that it receives a static IP address from your DHCP server as Local Tuya expects devices to register under the same IP address.
For the first entity, select type switch, the dp_id of the child_lock
(6 in my example above) and leave the rest blank. For the second entity,
select type sensor, dp_id 152, sensor type distance and unit either
mm or inch, whatever applies to you.
Do NOT try to configure memory_location as a select. It’s a write-only
attribute, and Home Assistant won’t activate the entity until it received
a value from the integration, which it never will.
This is as far as I got the last few times I tried. What I was missing was the “Set Datapoint” action of the Local Tuya integration which I finally discovered!
Automations
Instead, create three automations like this:
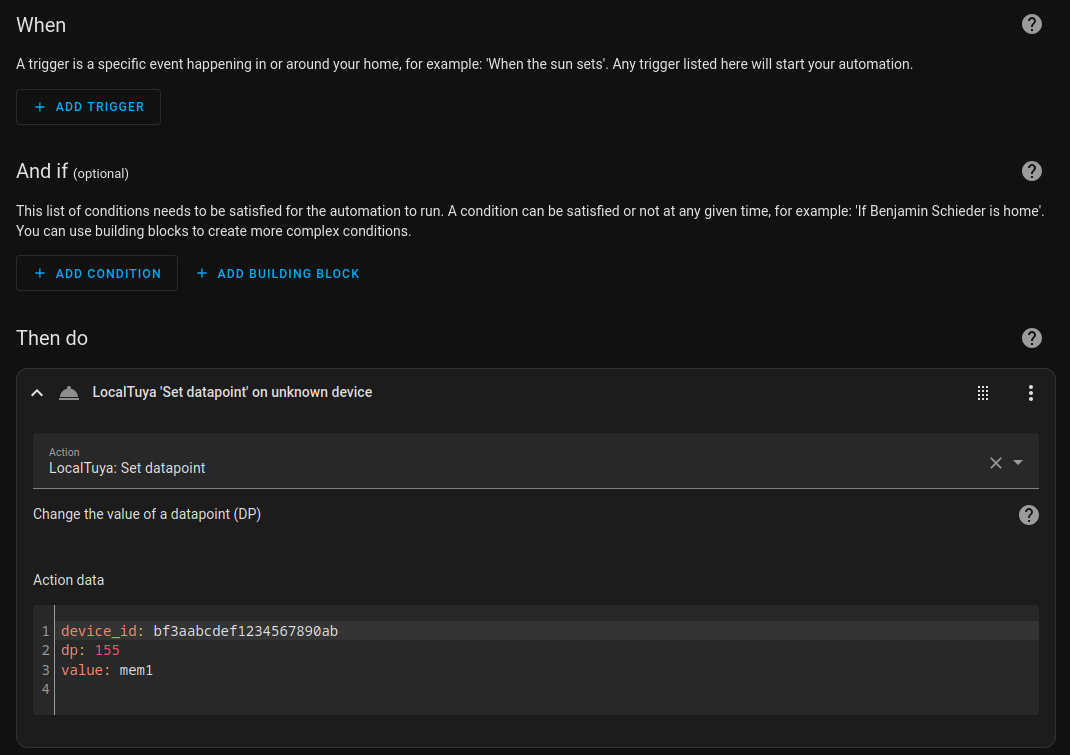
As YAML code:
alias: Localtuya - Standing Desk - Stand
description: Set height of standing desk to value in memory1 (standing, 104.5cm)
trigger: []
condition: []
action:
  - action: localtuya.set_dp
    metadata: {}
    data:
      device_id: bf3aabcdef1234567890ab
      dp: 155
      value: mem1
mode: single
I have not added any triggers as I want to run this automation from UI buttons and other automations. No need to have the same code several times.
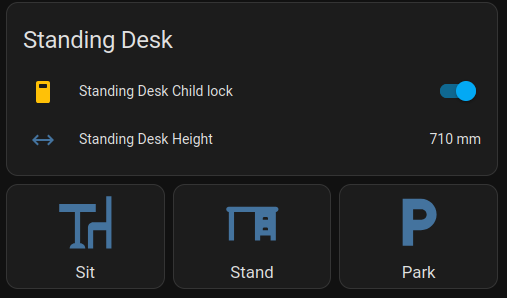
Here I created a dashboard element showing the state of the child lock,
the current height and three buttons triggering the respective automations:
Future
I have one more automation I want to integrate this with now (pseudo-code):
pseudo code
if NFC Desk detected then
	if switch.power_plug_desk is inactive then
		activate(switch.power_plug_desk)
		sleep 5 seconds
	end
	trigger(automation.wake_on_lan_PC)
	trigger(automation.localtuya_standing_desk_sit)
end
Or, in plain terms: When I place my phone on the NFC tag on my desk, activate the desk’s power (if it isn’t already), wake the PC through a Wake-on-LAN magic packet, and lower the desk to sitting height.
There’s of course many more things one can do this way. Assist commands, auto-raise the desk to Park position when shutting down the PC, and whatever you can think of but I can’t. I’m just happy I finally did it.
EOF
Subscribe via RSS
Comments
You can use a Mastodon account to comment on this article by replying to the associated Mastodon toot.